
Paper artists are getting more creative with all the tools, coloring supplies, and new products coming onto the market, while still incorporating rubber stamps into their art. The three cards featured in this issue were made by stamp artists who are adept at using the supplies they have on hand in new and fun ways, plus incorporating the use of basic dies to give their cards depth and texture.
Thanksgiving Blessings
With over 25 years of stamping and cardmaking behind her, Diane Tignor embraces the new techniques and supplies that bring her craft to the next level.
“A friend and I ventured into stamping in the mid 1990s, and it was embossing that got us hooked,” Diane reminisces. Her circle of stamping friends has grown in subsequent years, and the Connecticut native joins a group that makes a trip to the Springfield, Massachusetts, stamp show each year—2020 being the exception. “We get to see new products, learn techniques, and have a fun time. I’ve made tremendous friends in the stamping world.”
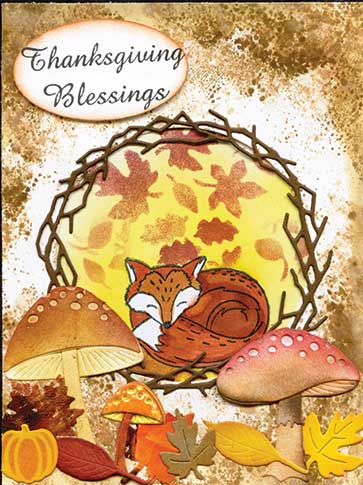
Thanksgiving Blessings by Diane Tignor
(Stamp and product credits: Fox—UK Magazine; leaf stencil—
made from Serendipity Stamps die; mushrooms—The Greetery; twig wreath die—
Memory Box; small pumpkin die—Spellbinders; greeting—
Purple Daisy; oval punch—Fiskars; leaf dies—unknown.)
Diana looks for opportunities to use dies with her stamped images to give her cards a bit of punch. The fox tucked snugly into its den is one example of using dies to enhance the scene. Here’s how Diane created this card:
- Step 1: “I wanted the den to be in a birch tree, so I pulled out my Teflon craft sheet, smushed some ink from a Distress pad directly onto the surface and spritzed it with water.”
- Step 2: She laid a piece of white cardstock, cut 4×5.375-inches, on top of the craft sheet and dragged it a bit to pick up color.
- Step 3: After the cardstock was dry, she cut a hole in the center of the ‘tree’ with a 2.75-inch circle die.
- Step 4: Diane stamped the fox onto a separate piece of white cardstock, then made a mask and covered the fox so she could apply the background. “I used a yellow dye ink, rubbed on with a finger dauber, then covered it with a stencil of tiny leaves.” The leaves were colored with Potter’s Clay ink by Memento, again with a finger dauber.
- Step 5: She removed the mask and colored the fox with Copic markers. “I don’t have a tremendous assortment of Copics, but I have enough to get the job done!” Diane positioned the fox behind the circle opening and glued it in place.
- Step 6: She added numerous embellishments to the front of the card. First a twig wreath die, cut from dark brown cardstock. “I have a thing about mushrooms,” Diane says, so it is no surprise the three-piece die-cut of mushrooms was added to her card. The stem, background, and cap were assembled after Diane colored them with dye-based ink. Glue tip: Diane generally uses two kinds of glue. She explains that “a glue stick is quick and easy for larger things, and Tombow Mono multi-liquid glue works well for smaller areas.” She applies the Tombo Mono glue sparingly because too much can seep out.
- Step 7: More embellishments include a tiny pumpkin and fall leaves that help anchor the bottom of the card. Diane stamped the greeting on a scrap of cardstock and punched it out with an oval punch, colored the edges of the oval, and mounted it to the front of the card with foam tape for another bit of dimension.
- Final Step: To finish, she edged the front of an A-2 craft-colored card with dark brown ink and adhered the decorated card front to it.
Elk in Winter
Christina Strickland is another stamper with over 25 years of creativity to her credit, but this is her first submission to RSM.
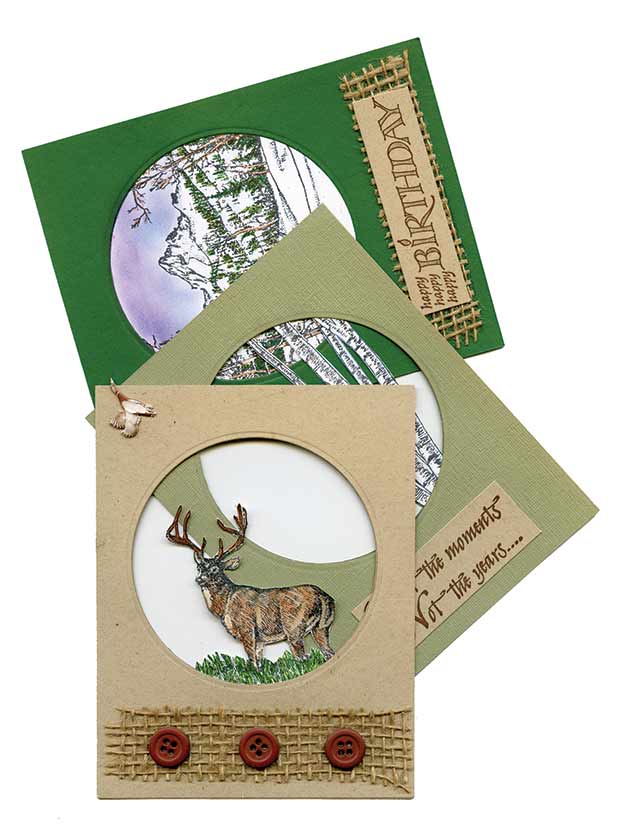
Her card was inspired by something she saw on the Art Impressions website. The company sells “circlets” collections, a set of small circle cutouts and images for each of three layers, so that, when the card is folded in thirds, a scene is created. Christina wanted to make a similar card that was larger and began the hunt through her massive collection of stamps to find the right images.
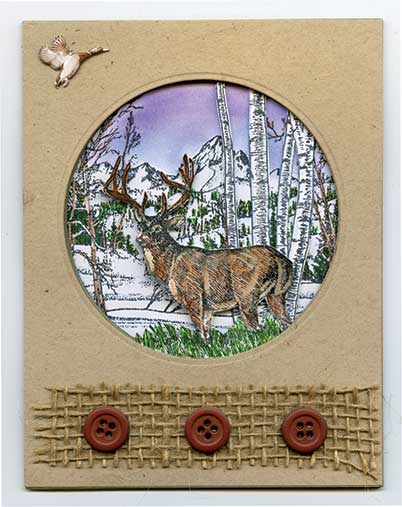
Elk in Winter by Christina Strickland
(Stamp credits: Elk—Stampin’ Up!; birch trees—Beeswax; Count the Moments—
Rubbernecker; mountain scene—Victorine Originals; Happy Birthday—Embossing Arts [I Brake for Stamps].)
The cool duck brad in the upper left corner of Christina Strickland’s card holds the three layers together.
“I sort my images by category. The stamps are cling-mounted and stored on laminated sheets of cardstock. Three sheets of stamps are stored in a single hanging file folder. Index sheets for each page of stamps, with a note about its category and folder number, go into a binder, to make it easy to find the stamp I want to use.” Christina admits it takes a great deal of time to get organized, but pays off when she needs to look for a specific image among her thousands of stamps.
The bull elk, the birch trees, and the background mountain scene are from three different companies, but work beautifully together. She stamped each image on a separate piece of white cardstock.
Christina frequently reaches for her Prismacolor pencils, which she used for this card. “I love how the pencil strokes come together when I use the blender pencil over them.”
- Step 1: Christina stamped the birch trees with Memento black ink on stark white cardstock, but gave them depth by edging each tree with a photo-blue pencil.
- Step 2: The foreground of the mountain scene was colored with Prismacolor pencils taking extra care with the sky. “I used small cosmetic brushes with very soft bristles to apply the ink to the sky.” she said. ”It allowed me to blend the colors and get into small spaces.”
- Step 3: The image of the elk was part of a larger stamp, so Christina took her time to fussy-cut it exactly the way she wanted it to appear. She added a layer of Royal Coat Decoupage to give it a glossy finish and a bit more stiffness. The stand of four birch trees was cut with care.
- Step 4: To begin the card assembly, Christina selected three colors of cardstock and trimmed them into two pieces of each color, 4.25×5.5-inches. Her plan was to sandwich the cut-outs between them. To do this, she used a die to cut a circle in each of the six pieces of cardstock, lining them up carefully in the same position. She placed the cut-out circles a bit closer to the top of the card, to give space below for the greetings that appear inside.
The bull elk was glued behind the center window on kraft-colored stock with Tombow liquid glue. The matching backing piece was affixed with double-sided craft tape.
Christine used an olive stock to frame the birch trees, positioning them to the right side of the window. She placed a greeting, stamped with brown ink on a scrap of kraft cardstock, below the window, then enclosed the cutout with the second piece of olive stock. The mountain scene was encased in two layers of emerald green, with a second sentiment below the window.
- Step 5: To hold the three layers together, Christina added a brad of a duck taking flight in the top-left corner of the card. The little strip of burlap ribbon and three brown buttons add a bit more dimension.
“I made this card for my son-in-law, who is an avid outdoor lover, hunter, and fisherman,” Christina says. “He easily could live off the grid and be happy!”
Falling Leaves
This colorful pop-open “Z” fold card by Diane Tignor is sweet and amazingly simple. Here’s how to make a greeting card, like hers, which stands on its own:
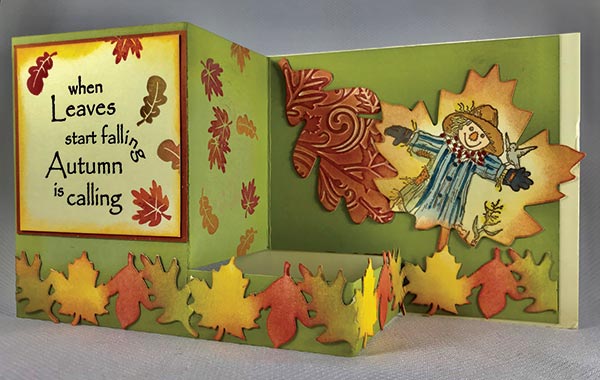
(Stamp and product credits: Scarecrow, small leaves—Hero Arts; sentiment—DRS Designs; large leaf dies—Stampin’ Up!/Sizzix; embossing folder—Darice; leaf punch—EK Success.)
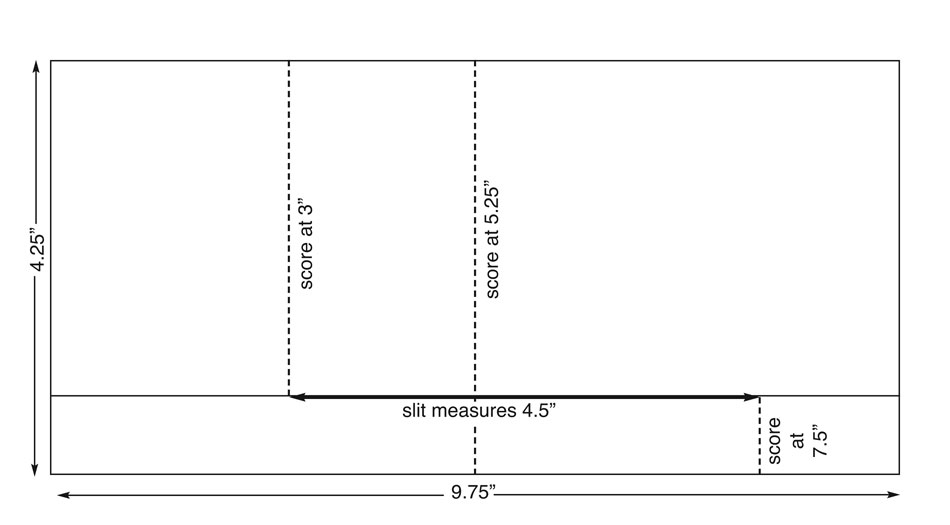
Use this template to create your own awesome stand-up card. Click Here for PDF
- Step 1: Start with a piece of cardstock, 4.25×9.75-inches, then cut a slit that starts 3” from the left edge and runs 4.5”. (See diagram above.)
- Step 2: Create several folds. One at 3”, one at 5”, and another at 7.5”. (Again, see diagram above.) Attach the layer with folds to a 4.25 x 5.5-inch cardstock base.
- Step 3: Add a double-matted sentiment on the left side of the card. Diane’s measures 2.75-inches square. Diane stamped tiny leaves in fall colors on the sentiment and central panel of the card.
- Step 4: For this card, an oak leaf die cut was embossed, colored with a sponge dauber, then placed on the right panel.
- Step 5: A scarecrow was added to a maple leaf die cut. “I used a stamp positioner to get him on the leaf in the right spot, so the little bird would show,” Diana noted. She used Copic markers to color the scarecrow and sponged some ink along the leaf’s edge to define it.
- Step 6: The garland of leaves along the bottom of the card was made using a paper punch. “There are three leaves on the punch, and you can make a continuous chain by moving the strip of paper after each punch.”
Diane colored the leaves using sponge daubers. “They are one of my go-to tools,” she adds. Diane enjoys making structural cards like this one. One final tip: “For more fun, you can pop a little battery-operated tea light into the opening when you display it to make it glow.”
Renee Devine lives and stamps outside of Philadelphia, Pennsylvania.