
Scenes with moving elements by Christina Hecht
Two and three-dimensional layered cards are fun to make for friends and family, but how exciting would it be to pack a visually rousing kick of physical movement into a card? Spin, slip, slide, and away we go! Read on and find out just how to do it.
The four cards featured here by Roxanne Marker include furry animal pals observing a solar eclipse, an otter enjoying some downtime, a tenacious superhero saving her hometown from aliens, and Amelia Earhart—or her surrogate—flying around the world.
Marker, the meticulous creator of these cards, lives in Kenai, Alaska, where it’s commonplace to see moose traipsing through her family’s backyard. Several years ago, Marker and a friend attended a workshop on slider cards hosted at a former stamp store in Soldotna, Alaska.
“We learned how to make the channel for slider cards using a ruler and X-Acto knife,” says Marker. “The project was really fun and I like the action of slider cards. Since then, Marker has made birthday cards for all her co-workers and even fulfills special requests.
When a friend of a friend asked if the stamper could make an eclipse-themed card for the friend’s birthday—which happened to be the same day as the solar eclipse in 2017—Marker designed a custom-made slider card featuring animals with their heads raised to the heavens like the one shown in these pages. “Now everyone wants a slider card for their birthday,” says Marker.
Die-cutting sets
During football season, Marker has made slider cards featuring the logos of her co-worker’s favorite teams—to everyone’s delight, a stamped football spins along a channel cut along the bottom of each card.
When Marker learned how to make slider cards she had to measure and hand-cut the channels for the moving images and use pennies or metal washers for the slider mechanism. Cutting out a straight channel with an artist knife took a little time, but it was doable.
Eventually, she discovered that metal die-cutting sets were specifically designed to cut a variety of different channels for slider cards. Marker has since graduated to using a Die Namics Surf and Turf die-cutting set from My Favorite Things,
a Sliding Star Thinlets set from Stampin’ Up! and a Swing and Slide die-cutting set from Essentials by Ellen Hutson.
“They get really easy to make after you do a couple. I’ve made about 10 solar eclipse cards for coworkers and family and now I can make the eclipse card in about 45 minutes or less.”
Making slider and spinner cards
While slider and spinner cards may be any size or shape, they usually consist of three different layers: a top layer where images are stamped and attached and into which the channel is cut, a back layer that provides support to the top scene and on which the sliding mechanism rests and slides, and a card base.
Because the top scenic layer will eventually be slightly raised above the back layer it’s important to follow these basic steps (more detailed steps follow):
1) Stamp, color and decorate the scene while it will still lay flat on a table. You also want to have all the elements in place before cutting out the channel.
2) Cut out the channel for the sliding mechanism. Always save the paper cut-out for gluing into the channel afterward because rather than have a blank cardstock channel, gluing the cut-out portion back onto the bottom layer makes the scene appear continuous and complete.
3) To get the full effect of the card, it’s necessary that the sliding mechanism can freely slide along the channel—to achieve this, the card’s top and back layers must be slightly separated to provide space for the mechanism.
4) Marker’s preferred method of raising the top layer is using adhesive foam on a roll, which she cuts into narrow strips—pre-cut foam strips are also available. The foam serves two purposes: it raises the top layer slightly up and off the back layer, thereby allowing the mechanism to slide unencumbered along the channel—it also provides support.
Detailed step-by-step instructions
1) Cut strips of adhesive foam the length of each channel and place them on either side of the track on the backside of the top layer. When making a card with two channels, be sure to place foam on each side of both tracks.
2) Cut additional strips of foam and place them all along the outside edges of the card. Remove the backing and attach the top layer to the bottom layer.
3) Take the cut-out channel section you saved earlier, align it with the open track, and glue it to the cardstock layer beneath the open channel.
Now it’s time to insert the sliding mechanism using pennies or plastic slider elements (see sidebar at right).
4) Place a penny or slider element beneath the channel cut in the top layer. Center it so the middle of the penny or slider element is in the center of the channel.
5) Use round foam dots or cut dimensional foam in a circular shape, so it will roll, and attach it to the center of the penny or slider element.
6) Take a second penny or slider element and attach it to the top of the foam dot (see diagram on page 27). Test run the sliding mechanism by running it along the channel.
7) Take a stamped-and-cut-out image or a die-cut image and glue it to the top penny or slider element. If the sliding image is quite long—a train or caterpillar, for example—place a sliding mechanism at each end of the image for stability. A single sliding mechanism is sufficient for spinner cards.

Die-cutting machines and Slider Elements
You can save your pennies and purchase packages of plastic slider elements designed to work with coordinating metal die-cutting sets. Purchased plastic sliders are designed to be sandwiched between two cardstock circles—rather than pennies—and the sliding image is glued onto the top cardstock disk.
If you own a die-cutting machine, consider purchasing a channel die-cutting set specifically designed to make slider cards. Many sets provide different channel lengths with straight and curving tracks for slider cards and full-circle channels for spinner cards.
Even if you don’t own a die-cutting machine, you can still create these fun cards—all you need is an artist knife and steady hand.
Before attempting a curve or an arch-shaped slider card, make one with a straight track first. Simply cut the channel out of the cardstock while making sure the lines of the track are parallel and straight and save the cut-out piece to glue on the supporting back layer.
Solar Eclipse

(Stamp and die credits: Rabbit, fox, matching dies—Lawn Fawn; arc channel die—Stampin’ Up!; ferret—RubberHedgehog Rubber Stamps.)
Navy-blue cardstock was transformed into a night sky after it was stamped with constellations in white ink. The yellow sun was glued in place before the arch channel was cut out.
Marker glued the green hills onto the background and attached animals that were stamped on cardstock and cut out with coordinating dies. As a pet parent to six ferrets, Marker added an image of a stamped ferret gazing upward like his pals are doing.
After applying foam tape along all the appropriate edges, the entire scene was attached to a background layer of yellow cardstock. The saved channel cut-out was glued directly to the yellow cardstock beneath the open track.
The completed sliding scene was attached to a white card. The moon, which is a circle punched out of black cardstock, was attached to the mechanical slider—as it rides across the sky it eventually covers the sun for a total solar eclipse.
Superhero Slider Card

(Stamp credits: Rocket ship—Lawn Fawn; all others—Stampin’ Up!)
A soaring lady superhero is defending a city from aliens that suspiciously look like relatives of the renowned Teletubbies. Does the spaceship soaring across the sky belong to the aliens or is it coming to the aid of our plucky ponytailed protagonist?
Marker has made variations on this superhero card—she used a “man superhero” image on a card she gave to a male co-worker.
Be sure to stamp the scene and the atomic sunbeams before cutting out the channel—the rays will help with lining up the cut-out when it’s time to glue it to the bottom layer of cardstock.
You Otter Try This
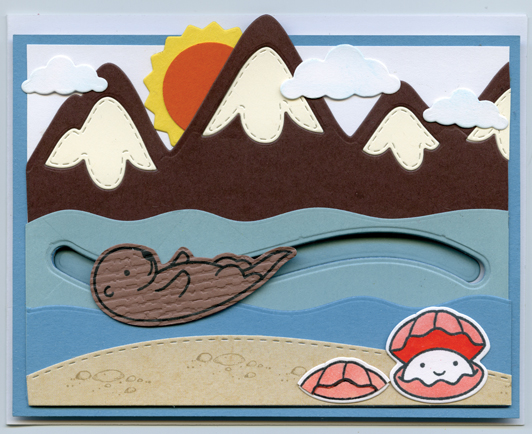
(Stamp credits: Otter, clam, sun—Lawn Fawn; mountains—Momma Elephant.)
An otter is floating on his back in the Alaskan sea—nonchalant, yet stealthy, he’s making his way to a pair of lunch-worthy clams.
The curving channel cut out of blue cardstock resembles a swirling current and looks like part of the water. Sometimes it’s possible to blend a cut-out channel into a scene so it looks as if it’s meant to be part of the card.
The otter was stamped on textured paper to give the little fellow authentic looking fur. Then he was cut out using a coordinating metal die and attached to the slider mechanism. A few pebbles were stamped on the sandbar to provide texture. The stamped clams, landscape, sun and clouds elements were cut out with metal dies and appropriately layered to create this snapshot of Alaskan scenery.
The inspiration for this card came to Marker easily—she and her husband enjoy going to Homer or Seward to photograph sea otters floating in the ocean. “Alaska is so inspirational—the landscape is breathtaking, and the winters are beautiful. With the moose, bear, caribou and bald eagles, it’s hard not to be inspired.”
Soaring High Spinner Card

(Stamp credits: All—Stampin’ Up!)
High in the sky, above a pair of earthbound creatures, soars a biplane, its flight path plotted out on an antique-looking map.
A metal die was used to cut out the ring-like channel in the center of the card. The resulting paper pieces included a ring and a smaller circle shape for the center. When making spinner cards, attach short sections of dimensional foam tape all around the circular edge of the open track as well as around the outside rim of the paper circle. Make sure to leave a large enough space around the edge, so the penny can move freely in the track.
Remove the backing from the foam tape pieces and attach the scene to the supportive back layer. The next step entails making the continuous circular track by perfectly centering the cut-out circle within the larger circular opening—the channel should be the same width all the way around to ensure that the sliding mechanism travels smoothly around the entire circle. Attach the cut-out ring of the channel to the back layer.
Christina Hecht lives, stamps, gardens and caters to cats in Arizona.