
Pattern Pizzazz
Nature’s bounty is on display • By Melanie King.
Kick your background stamping up a notch with these tutorials for stamping perfect plaids and stunning stained glass patterns.
For 67 years, DRS Designs (formerly Danbury Rubber Stamp) has served the community of Bethel, Connecticut, and the surrounding area. The small, family-owned business began as a personal and business stamp supplier.
In 1992, DRS printed its first Art Stamp Catalog—and, as they say, the rest is history. Twenty-five years later, DRS offers a rotating stock of approximately 1,000 images. While the company still produces custom business and personal stamps, its focus is mainly offering art stamps online.
Sue Wichman, the newest member of DRS Designs, with a mere 27 years at the company, designs the stamps. Samantha Conrad is in charge of producing the rubber at the company. She also oversees the website and has been keeping things organized for 37 years. Veteran Louise Wichman began answering phones back in the late 50s, and she is still the trusted customer-service representative and bookkeeper.
As the stamp designer, Sue normally begins with a vision of how she’ll use a stamp and she often creates it as soon as the first batch of rubber comes out of the press. Many of DRS’s designs were born because Sue didn’t have what she wanted to make a card, including the stained glass stamp featured here and many of the company’s sentiment stamps.
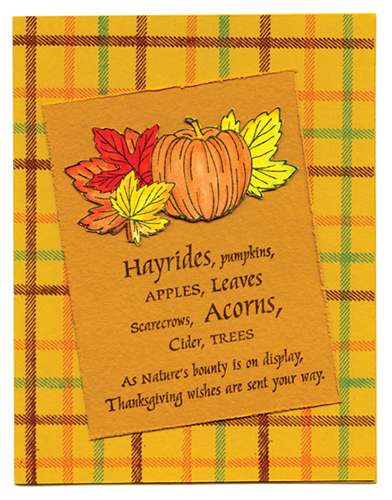
Plaid Pumpkin
Sue likes to add something unique to every card she makes, even if it’s just a piece of ribbon or using a stamp in a different way. The inspiration for her Plaid Pumpkin card was DRS’s Woven Plaid stamp, which measures 6×1.5-inches. Sue used only the smallest line to stamp the background for her card.
- Ink the smallest line of the Woven Plaid stamp with orange ink. Stamp it close to the bottom of the card.
- Stamp the line again, approximately 1.25-inches above the first line and continue the process until you run out of space.
- Switch to brown ink and stamp above every orange line. Switch to green ink and repeat.
When working with the plaid stamp, stamp in the center of the card first. Rotate the card so you’re always stamping above the image you’re lining up the stamp with. Always re-ink your stamp between impressions. Find a full tutorial for the Cut Apart Plaid technique at www.drsdesigns.com/cut-apart-plaid.
(Stamp credits: All DRS Designs.)
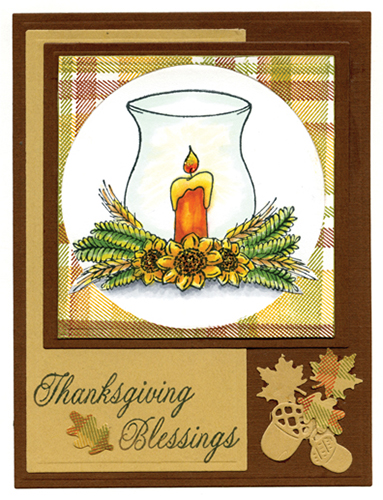
Thanksgiving Candle
A fan of fall colors and plaid patterns, Julie Warner created Thanksgiving Candle using leftover pieces of die cuts and scraps of paper. She used the Woven Plaid stamp, inking each strip with a different color. Julie added a little yellow to parts of the flowers and leaves that face the candle to give it a real-life glow, and she shaded the sides of the glass light blue to give it a realistic glassy reflection.
She fussy-cut the branches and lifted them over the plaid frame to create another layer of dimension.
(Stamp credits: All DRS Designs.)
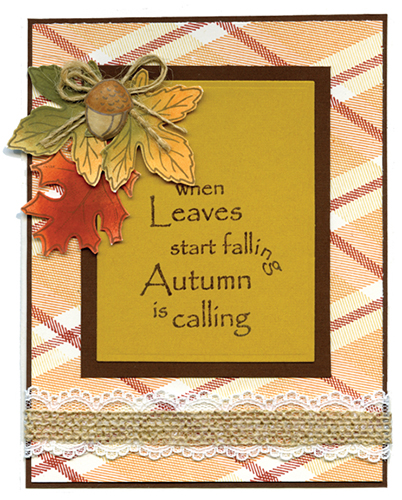
Autumn Is Calling
For her Autumn Is Calling card, Janett Ray was inspired by the view from her craft room window on an autumn afternoon. “No one does colors as well as Mother Nature,” she says.
(Stamp credits: All DRS Designs.)
Janett used the same Woven Plaid stamp with a slightly different technique to create the background. She placed the largest part of the stamp on an angle in a stamp positioner (she used the MISTI stamping tool from My Sweet Petunia), and began stamping in the center of the card with cantaloupe ink, moving the card up and leaving a half-inch space between stamping lines.
She stamped above and below the center lines to cover the card, turned the card a quarter turn, and stamped across in the same manner. In the half-inch spaces she used the smallest part of the stamp and stamped across with fire brick ink.
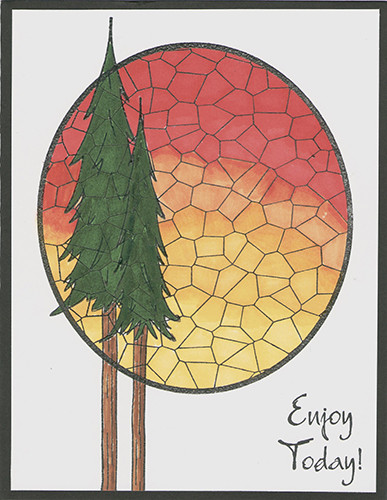
Tall Pines
The inspiration for the Tall Pines card came to Sue when she realized she had only used her Stained Glass stamp for holiday cards. She had recently designed the Double Tall Pines stamp and as she put it, was “itching to get it inky.”
(Stamp credits: All DRS Designs.)
- Stamp the Stained Glass background on white cardstock with black ink.
- Stamp the Pine Trees on top of the background with black ink; sprinkle on clear embossing powder and heat-set.
- Use water based markers to color the bottom of the background bright yellow.
- Continue coloring from the bottom up, using a golden yellow, light orange, orange and finally, red.
- Color the trees with two shades of green and two shades of brown. Sue recommends shading the darker color into the section below it when switching colors on this background.
You can see a full tutorial for the Stained Glass technique on the DRS website at www.drsdesigns.com/ stained-glass-pine-tree-card.
Resources
DRS Designs is located at 217 Greenwood Ave., Bethel, CT 06801. The company’s store is open Monday through Saturday, 10 a.m. to 4 p.m., closed major (and some minor) holidays. Visit their website and find numerous card galleries, as well as tutorials. A blog connection can be made via their site, along with access to the extensive catalog of stamp designs. DRS offers an 84-page print catalog for $9. Call (888) 792-3740 or (203) 744-2858.