
Vintage Valentines
Making cards with an old-fashioned look • By Karen Sweeny-Justice
Long before she got involved with stamps, Aimee Eliason was involved with cards.
(Stamp credit: Jambalaya’s Stubby Stampers.)
“I became fascinated with antique cards at age 12. I was at my grandmother’s for a sleep-over, a special treat just for me as I was the oldest granddaughter. That evening she pulled a box out from under her bed and showed me some of the Valentines she’d received from classmates.
My grandmother was born in 1915, so I’m guessing these cards were from the 1920s. They were so incredibly intricate and beautiful! I couldn’t believe these were the cards classmates exchanged back then. I was used to those ‘cheap’ Valentine cards sold in boxes of 30 at Kmart. Oh how I wish I had one of my Grandmother’s Valentines as a keepsake! They were worthy of framing.”
And while special, they may have been mass-produced by a company you may recognize: Hall Bros., the precursor of Hallmark Cards. Hall Bros. sold Valentine’s Day postcards designed by another company as early as 1913 and in 1916 began producing its own card designs.
“To make the stamped cards pictured here, I first did a bit of online research to find cards similar to what my grandmother showed me,” Aimee says. “It took some searching, but I learned that ‘Victorian Greeting Cards’ was the best search term for the look I was going for. It was fun to look over all the old cards for inspiration.
“I don’t know if you could call me an antique card historian, but I’m naturally drawn to this type of card when I see them. The yellowing paper, the muted colors, the old-fashioned characters and the dresses with floral embellishments—all those elements speak to me.”
(Stamp credit: Jambalaya’s Stubby Stampers.)
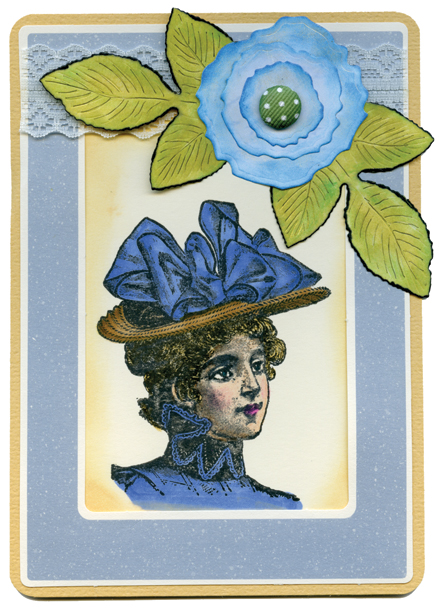
The Victorian Ladies
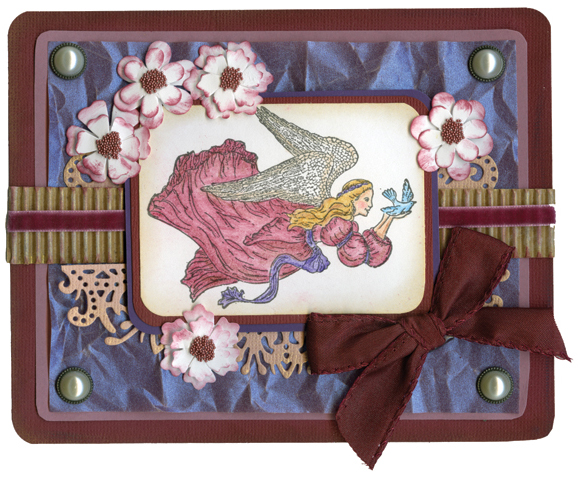
Each of Aimee’s cards are named for a different lady. “They were tricky to name,” she says. “In the end I Googled popular Victorian Era feminine names and came up with the titles.” In order of appearance, they are: Adelaide’s Hat, Clara’s Book, Isabella’s Doll and Angel Violet. Of the four, Violet was the hardest to create.
“Hands down, the most difficult card was the angel. I wanted to create a dimensional piece, almost fitting for a shadow box, and that required multiple layers. I experimented with textured papers and, in the end, created my own textured paper by crinkling up a piece of iridescent purple velum. I had numerous die-cut embellishments and tried various arrangements intermixed with the paper layers.”
Aimee purchased the flowers at a Dollar Store. “I removed the gemstone center and glued seed beads in its place. The final look came after lots of playing around with various papers, ribbons, flowers, and brads.
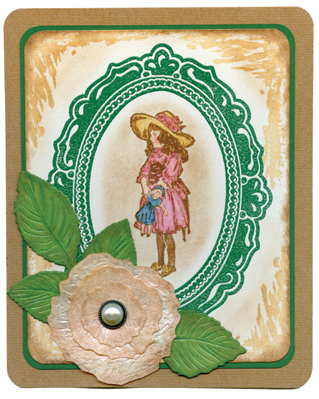
“The look I was going for was based on the Victorian cards,” she says. “If you Google images of them, you can see a commonality among them. The main figures are relatively bright hues with the backgrounds muted with pale yellows, tans and peach.
“I often color my stamped image after selecting the papers I plan to use. This was especially true with Clara’s Book. It was helpful to find coordinating papers from a 12×12 pad of patterned cardstock. Once I selected the papers, I colored Clara to match.”

(Stamp credit: Jambalaya’s Stubby Stampers.)
Tips
Aimee, an American who lives in Overijse, Belgium, offers these tips for creating your own ‘vintage’ cards:
- Feature Victorian images: “Victorian greeting cards often featured people in period dress. Think individual ladies, children, and couples,” Aimee says. “Use floral accents, especially roses and frames.”
- You don’t need a sentiment on the front: “When a sentiment was used on a Victorian card, it wasn’t a feature of the card but subtly written using older language (i.e. ‘beau’ for boyfriend, etc.)”
- Use vibrant colors: “Colors could be vibrant, but with shades unique to the Victorian and Edwardian period.” Aimee recommends using roses, sage greens, mauve, ivory, golden yellows, and deep reds, but no primary color shades.
- Go old and bold: We’ll cover aging paper in a bit, but Aimee suggests stamping with dark brown ink to capture “a very old look.” “Chalk applied to the background of a stamped image, or used to color the image itself, lends itself nicely to an antique-look card,” she adds.
- Get Trendy: “There’s a trend now to add multiple paper layers to old-fashioned looking cards,” Aimee says. “Flowers, ribbons, pearls, etc. look great. It might even be a nice way to feature a family photograph in a shadow box style frame, but keep in mind a thick card will require extra postage.”
(Stamp credits: All—Jambalaya’s Stubby Stampers.)
Aging paper
A web search for the phrase “how to age paper” turns up quite a variety of pages—using tea or coffee as a stain are the front runners.
“I didn’t care for this method for a number of reasons,” Aimee says. “It’s messy and smelly, warped the paper when it dried, and there’s no control over where the age stains appear. But, if I needed an oversized pirate map for a child’s birthday party, I would totally use this aging technique.
“I prefer to ‘age’ paper using pigment inks and a make-up sponge applied to paper edges. Ivory paper with peach and brown pigment ink applied to the edges is my favorite look.
“Applying the same color of pigment ink as the paper to the edges with a make-up sponge darkens the paper just a bit to give it an older look. I also found 12×12 sheets of brand new ‘aged’ paper in a tablet at my local craft store.”
When adding color to edges, Aimee often uses homemade daubers. “I make them using a 1.5-inch length of PVC pipe and a discount store make-up sponge. Hardware stores carry various diameters of PVC pipe. Mine are quite narrow at half an inch in diameter, but the dauber could easily be made with a 1-inch diameter pipe.
“Using a PVC pipe-cutting tool makes cutting the length very easy. A whole wedge of sponge doesn’t fit in the half-inch diameter, so I cut off a piece and use an unsharpened pencil to push it through and create a smooth ‘bump’ out one end that becomes the dauber. “When the sponge starts to show wear, it’s easy to replace it with a new piece of sponge.”
Karen Sweeny-Justice writes for RSM from her home in Surprise, Arizona.