
The Reinker column by Jackie Shenise in the Spring 2021 issue features artwork by Linda Accuosti. Her bright and cheery cards start with a background made with Distress Oxide inks on watercolor paper. Images are then stamped and embossed, then colored with various markers, brushes and pencils.
Celebrating Spring by Jackie Shenise
Spring is finally upon us and with longer, brighter days; it’s only fitting our artwork reflect this. Thanks to Linda Accuosti, we have three bright and cheery cards made using a Distress Oxide Technique, learned from fellow stamper Michelle Borsack, who keeps a cardmaking blog, bellissimacards.blogspot.com.
“The card was simple—a Blue Knight floral design embossed in gold, then watercolored,” explains Linda. “What made it so interesting was the variegated background that looked almost ‘splashed on.’ That’s because Michelle created the backgrounds on watercolor paper by randomly brushing on Distress inks, then misting the paper. She sometimes blots ink off so the water spots show up nearly white.”
Two videos on Michelle;s blogsite shows how she creates the backgrounds and how she embosses and colors the images: https://youtu.be/YYkVCKjkIGw and https://www.youtube. comwatch?v=TR3fayhGYro.
Here’s her technique spelled out:
Michelle’s Background Technique
- Start by placing watercolor paper on a waterproof surface. Linda suggests using cold press, about the same weight as cardstock or heavier.
- Brush or stipple a variety of Distress and/or Distress Oxide inks onto different areas of the paper. Linda uses a large foam dauber and a toothbrush-style makeup brush.
- Mist/spritz the inked paper with water. Expect the ink to react, leaving a rain-like design. The paper can be tipped to combine or move colors around. At this point, some color may be removed with a paper towel to add contrast between wet and dry areas. Small detail stamps may
be pressed into the design using the same inks as ones brushed or stippled onto the paper. Wish you were Near and Sending You Smiles have small designs stamped in green and blue. - Completely dry the paper either by air or heat gun, depending on your preference and patience. Linda prefers to air dry.
- Stamp and emboss an image onto the now-dry paper. On the cards shown here, Linda used Encore gold pigment ink and Stampendous detail gold powder.
- Watercolor the image’s open areas with shades darker than the background to bring images to life. Linda used Zig Clean Color brush markers and a waterbrush on her cards. Michelle’s videos show other options.
Linda’s Tips and Tricks
If your paper warps slightly, you can correct this a few ways.
• First, while the paper is still damp, sandwich the paper between waxed paper or another non-stick surface. Weigh this down with a heavy flat object—for example, a big book or stack of stamp boxes.
• Another option: pull the dry, warped paper back and forth along a hard surface, such as a table or counter edge.You can also bend the paper into shape with your fingers to counteract the warp. Since the paper will eventually be adhered to a cardstock base, the warp is usually negligible.
Finding the right images: Linda wanted a whimsical design for her cards. Fortunately, Outlines and Hampton Art offer great image options, with plenty of space for coloring.
This technique offers a lot of fun and variety for stampers who enjoy coloring. For those who prefer not to color, results will still look great without detail painting. These backgrounds are quite beautiful on their own.
Linda prefers making several card-sized backgrounds at the same time. She suggests taking a large watercolor sheet for the background technique. Then, once dry, you can cut the sheet into card-sized pieces.
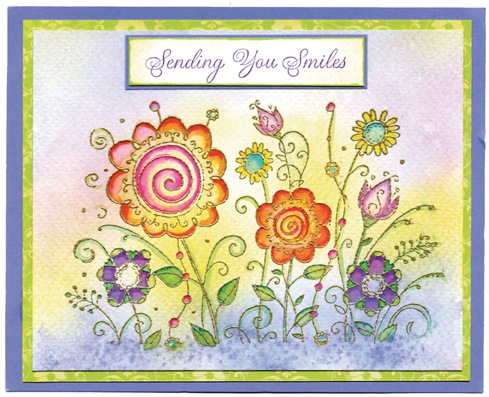
(Stamp credits: Flowers—Outlines; small stars (below plants)—Rubber Stamp Tapestry; sentiment—Impression Obsession.)
This beautiful flower garden was created with soft pastel shades of color using the watercolor background technique. Next, Linda stamped the sentiment in purple ink on a small piece of smooth cardstock. After edging the paper with a green alcohol marker, she mounted the paper on green patterned paper, then a solid piece of purple cardstock.

(Stamp credits: Fairy—Outlines; vine & stars (below plants)—Rubber Stamp Tapestry; sentiment—Penny Black.)
A delicate little fairy sits quietly perched on her fabulous mushroom enjoying a beautiful spring day. After creating the background and embossing the image, Linda colored the open areas on the plants, mushrooms, and fairy. The words “Wish you were Near” were stamped in green ink on smooth paper outlined with a pink alcohol marker. The completed scene was layered on pink paper with a small, raised circular pattern, then green patterned paper.
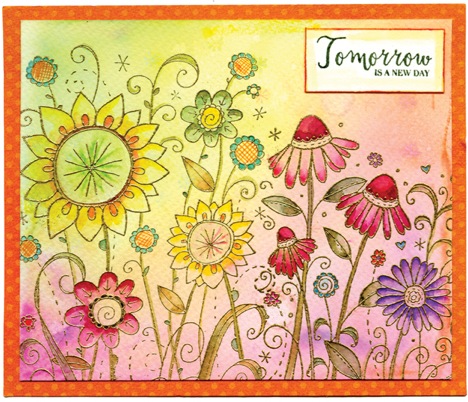
(Stamp credits: Flowers—Outlines, Hampton Arts; sentiment—Wplus9.)
This bright and happy card provides us with a colorful flower garden. The flowers are two separate stamps that were easily combined to appear as one larger image. The words “Tomorrow Is a New Day” were stamped in dark green, then edged with a dark orange alcohol marker. A bit of yellow paint formed a second interior frame around the wording. Once adhered to the painted layer, the completed scene was mounted on patterned orange cardstock.
Reinker Jacquelyn Shenise is the author of Easy Cards for All Occasions.